Blog

The Fresno Experiment – Exponential hive increase

Although I live in the Tehachapi Mountains of Kern County, I have to travel to Fresno California a few days a week due to my “real” job (engineer). Coincidentally, for my “side” job (beekeeper), our Almond pollination contract is also in Fresno California. After the 2017 almond pollination season was over, Steve, my co-worker from Fresno asked if he could buy a beehive for his dad who wanted to have bees around to pollinate his fruit trees. We kicked around the idea for a while and finally decided to take two hives to Steve’s house in Fresno after we pulled the hives from the almond orchard (Steve decided that he wanted a beehive as well). The plan was to split those two hives so Steve and his dad could each keep a split. However, when we inspected the hives a few weeks later, we found that the queen in one hive had died and the hive had a laying worker(s). So to start out with, we really only had one good (queen-right) hive as the one with the drone layer(s) was very likely going to fail.

Out of curiosity I suppose, Steve asked how often you can split a beehive in one year. In other words, if you start with one beehive, what is the maximum amount of queen-right beehives that you can have by the end of the year? I answered that I didn’t know, as I’ve never tried it before and there are so many variables to consider. But it did leave me wondering how many hives a person could make if their only goal was to make more beehives (not honey production), and so the Fresno Experiment was born.

The premise of the experiment was to find out how many hives we could make that would be able to overwinter on their own stores of honey (or very limited feeding).

The experiment started in mid-March and the good beehive consisted of 8 frames of bees and the bad hive had about 10 frames of bees (and a lot of drone brood). The first two moves we made were:

  • Put a frame of eggs and young larvae from our good hive into our failing hive to see if they would raise a queen (Although it was unlikely to work). In exchange the good hive received a frame of pollen/honey from the bad hive.
  • Split the good hive by removing the queen and two frames of bees and one frame of honey/pollen into a nuc box. The remaining bees (5 frames) in the original good hive went to work raising a new queen.

In mid-April we checked all three hives again. The original hive with 5 frames of bees had raised a new queen that was already laying eggs in a very good solid pattern. The nuc box with the original queen was also doing great raising bees and collecting resources. The failing hive failed to raise a good queen, so we combined it with the original queen, which we moved from the nuc box to the single 10 frame box.

In mid-May we checked the two hives and they were doing great. They were growing very fast so we decided to put a deep super on each hive.

In mid-June we checked the two hives and they had filled most of the second super with honey, pollen, and some brood. At this point, we picked the strongest one (the new queen from March) and moved her to a new hive with 2 frames of bees and left the remaining bees to raise new queens.

IMG_3750
Figure 1: The bees were very crowded so they started building comb around the queen cells.

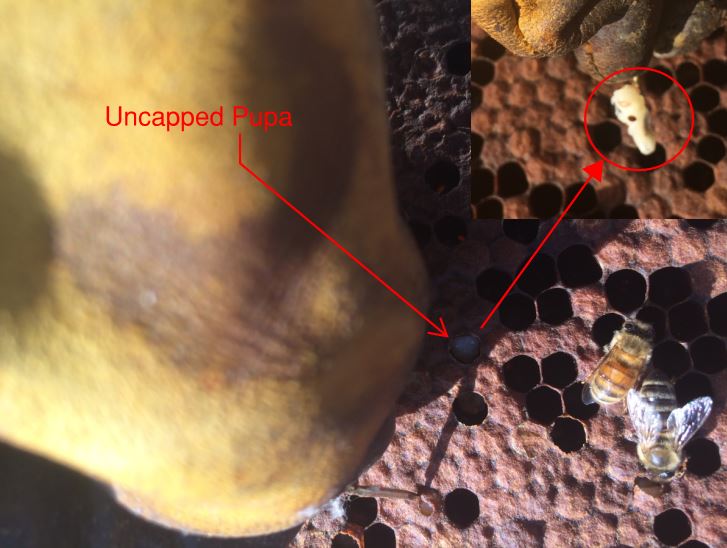
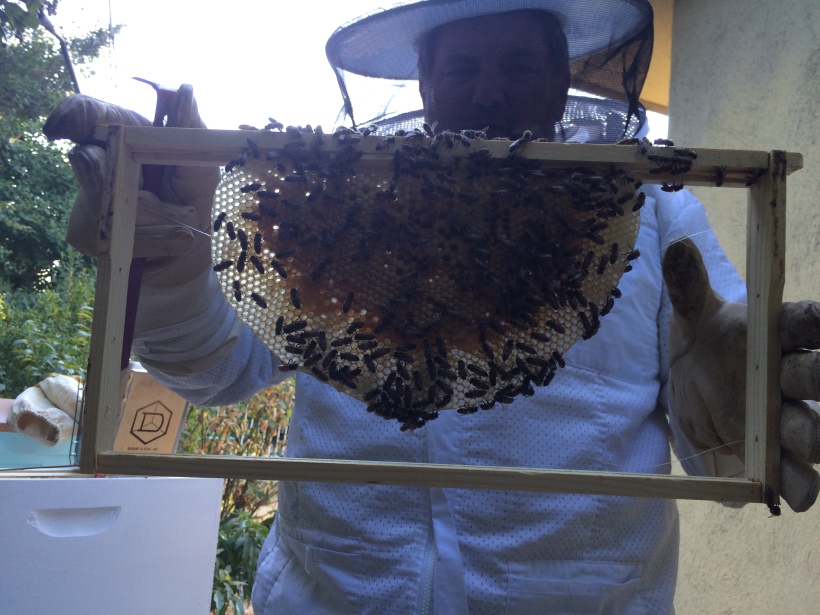
We made a frame to hold queen cell cups and grafted 14 queen cells, using the eggs from the original queen. All 14 queen cells were accepted and the hive went to work raising 14 new queens. Crowded bees make good queen cells, but if you leave too much room they will build wax around the queen cells as shown in figure 1.

Ten days later we made up 12 nuc colonies and inserted a ripe queen cell into each nuc. We only did 12 colonies because we were only able to pull enough resources from both hives to make 12 – 3 frame nucs. The goal was to get at least two frames of bees and one frame of resources for each nuc.

Three weeks later in early July, we inspected the nuc’s and found 10 laying queens. However, since the nuc’s were in the same yard as the original colonies, we experienced some drift back issues where some bees migrated back to their original hive location (we left a nuc in the original location of the source hives to catch the drifters). The drift left  some nuc’s seriously debilitated, so we decided to combine the weak nucs and keep the best queens. After combining, we had eight new queens in new colonies. One brood cycle later, we moved all of the nuc colonies into 10 frame boxes.

IMG_3909
Figure 2:  Steve holding a frame of new wax and capped brood.  Picture taken in July.

In early September we checked the hives again and all but two of them were overflowing with bees. We also noticed that most of them had 2-3 frames of honey. The strong hives got an additional deep super. Due to the location of Steve’s house in a residential area with plenty of mature trees and shrubs, we expect to get a solid fall flow. This should allow most of the hives to fill the top super with honey by mid-November. If they don’t, then we may have to feed them some syrup so they have enough to last them through our coldest months (Mid-November to Mid-February), but this should be minimal.

Although the colonies still have to overwinter, I think it’s safe to say that we got the answer we were after. In Fresno California, if you start with one good beehive, you can end up with ten good hives by the end of the year (1 original queen + 1 March queen + 8 July queens). Also, if we had moved our July nucs to a different location to eliminate drift back to the original hives, we would have been able to keep 2 additional colonies (although they would all be a bit weaker). The biggest key to success in this type of experiment (exponential increase) is to have a location with decent year round forage (especially pollen).

Overall, Steve and I had fun conducting this experiment (and he even got a beekeeping 101 class in the process). I have to admit that I was impressed by our results. You sure can reproduce bees quickly if you get a few fundamentals right. I warn anyone that tries to reproduce these experiment results that buying all that new bee equipment can get time consuming and expensive. But if you sacrifice 1 years’ worth of honey from one hive, you can get 10 times the amount the following year!

Late Summer checkup and thoughts on Varroa resistance

Here in California we had a very hot summer. For most of June, July, and August we’ve had temperatures over one hundred degrees. Most gardens with full sun exposure did not do very well and neither did bees. We were really able to see the difference between hives that were shaded (or had some shade throughout the day) and those in an open field fully exposed to the sun. On average the shaded beehives fared much better, with the exception being that they attract more hive beetles. As a matter of fact, we barely ever see any hive beetles on the hives that are fully exposed to the sun; But we are spoiled here in California and hive beetles aren’t a big issue at all (at least not for us).

It was the last weekend of August and we hadn’t really done any hive inspections all summer, so it was about time to get out there (in the sweltering heat) and check some hives, especially our spring splits and new queens. About three quarters of the hives we checked were doing very well and had plenty of honey/pollen stores and the rest will need feeding in late winter (to some extent). Unfortunately the hives were too busy carrying water all summer and not foraging. But oh well, at least we get mild winters…

Today, I want to concentrate on some thoughts about breeding for Varroa resistance that were inspired by our recent hive inspections. Specifically, I want to expound on the concept of the constant and ongoing process of breeding for varroa resistance and how (in the near future) we can’t expect our apiary to reach “varroa resistance” to the point that we quit breeding for it.

In our personal experiences, we have found that we can take the most hygienic queen and create a batch of queens from her, yet the degree of varroa resistance (using the term “varroa resistance” very loosely)  in the daughters will vary quite a bit. For example, in a yard of 18 hives, we found one that let varroa get out of control, yet the hive next to it was showing great signs of hygienic behavior. We cannot guarantee it, but it’s very probable that these two hives have queens that are sisters (share the same queen mother). We can guarantee that the grafted queen cells that were put into these hives were sisters, but I suppose that there always exists the chance that one of the queens was superseded (as we only got around to marking the queens during this same inspection).

First, let’s take a look at the hive that was doing poorly. By doing poorly, we mean that it had too many varroa mites, other than that it was full of bees and had plenty of resources (all of the hives at this site are on double and triple deep supers). I have a pretty good eye for varroa and while looking through the brood chamber for the queen, I managed to spot a total of two bees with a varroa mite attached to them. We might let one slide, but not two. As a general rule, if you can see multiple varroa mites, there are many more lurking around, probably in your drone brood.  So we pulled a frame of honey that also had plenty of capped drone brood and sent it to our laboratory for analysis. By laboratory, I mean that I had my two nieces and my daughter pull out larva (drone and worker) and count how many cells were infested (so I can calculate an infestation ratio).  Here are some pictures:

This slideshow requires JavaScript.

Based on a sample of 140 drone cells, 76 of them were infested with varroa (that works out to 54.3% infestation). On a sample of 111 worker cells (from the same frame), 5 of them were infested (4.5% infestation). That told us two things: First off, that this queen needs to go. I personally killed her on the spot and we will introduce a frame of eggs from a different hive in a few days (note for beginners: all queen cells need to be destroyed first) for the hive to raise a new queen. Here in California, we still have plenty of drones in September to mate the new queen, so the hive has a good chance of making it.  The second thing that this experiment told us is that indeed varroa mites prefer to infest drone cells whenever possible, but of course, this was no surprise.

A side thought: If a person wanted to treat this hive, they would simply wait about two to three weeks (depending on when you start counting) until all of the old queens’ larva hatched out and treat the hive. Since there is no brood present, all of the varroa mites will be exposed to the treatment and you would get maximum efficiency. If you’re like us and don’t treat your hives, then you just sent the colony into a “broodless” period  and many mites will die of old age without being able to infest the new batch of larvae from the new queen. The broodless method works well for us, but if the hive doesn’t make it, then oh well, we tried.

Now on to the good hive. Ironically, the hive right next to the infested one was doing great and showing very good signs of hygienic behavior. The hygienic bees remove worker pupa that are infested with varroa mites. The pupa that are removed are easy to spot because you’ll see empty cell “gaps” surrounded by capped cells. The tell-tale sign is when you see the removal in action. Before the infested pupa is completely removed, they are first uncapped. The uncapped cells are also easy to spot because you will see the white pupa heads stand out next to the brown wax background. below is a video that shows an uncapped pupa cell and the pupa after we have pulled it out. You’ll notice the varroa mite clinging on to the pupa. The video quality is not great due to us using a cell phone camera and the sun being right over us. However, you can still clearly see the uncapped pupa being removed and the mite attached to it right at 11 seconds into the video.

Below are still pictures that show the uncapped cells and the pupa that we remove from them:

Varroa mite3
Notice how the white pupa stands out in the brown background

In the picture below, you’ll notice all of the “gaps” in the brood. Some beekeepers may mistake this as a bad queen with a spotty brood pattern. But most likely those are pupa that have already been removed.

Varroa mite2
Notice the cell gaps that appear to be a spotty brood pattern

Varroa mite1

We did a quick experiment on the hygienic hive as well. Out of 10 cells that had been chewed open, 8 of them had a varroa mite. We can assume that the bees were at least 80% successful at identifying worker cells infested with varroa.  However, we have no way of knowing if the varroa mites of the other 2 cells had already crawled out before we found that the cell had been chewed open. So the success rate could be (likely is) higher.

You’ll notice in the video above that there is a bee with deformed wings crawling around. That is indicative of the fact that varroa has been present and has infected some bees with Deformed Wing Virus. What makes a “good hive” is not that it is free of varroa, it is the fact  that they know that varroa is present and are doing their best to address the issue. This hive in particular has begun aggressively removing infested pupa as is indicative by the empty cells in the brood chamber (click here to see my post on hygienic bees that deals with this behavior in more detail) as well as the uncapped pupa that we removed ourselves. When we see a hive expressing this much hygienic behavior, we are confident that they will survive on to next year. They prove this year after year and it’s what we call our “survivor bees”.

Those of us beekeepers who open mate our queens have to constantly monitor our hives and cull out any that don’t make the cut. Since our queens are free to mate with whatever drones they choose, their daughters aren’t guaranteed to be as good as the mother. Your best survivor queen can mate with terrible drones and produce terrible daughters. But realistically, good queens produce some good daughters and it’s our job to propagate only the good ones.  In this manner, breeding for varroa resistant bees is a constant ongoing process. Unless we move our bees to an island or instrumentally inseminate our queens, this will continue to be our struggle as beekeepers. The good news is that if you do this long enough, it gets easier and easier as your apiary (and the feral bees around you) develop a “regionalized” varroa resistance.

There are a few traits that we have identified that tell us right away whether a hive will be a survivor or not (Most of them aren’t seen as qualities from a beekeeper point of view).  Maybe I’ll cover that topic in a follow up blog. But for now, we feel good about the status of our bees heading into the fall. We got through approximately 50 hives before the heat made us throw in the towel and we didn’t notice any other hive that showed signs of a severe varroa infestation. It doesn’t get better than that.

Hygienic Bees

varroa on bee
A varroa mite sucking on a bee. If left untreated and if the hive cannot control the infestation, the hive will collapse. Survivor bees are better at dealing with varroa.

If you are a new beekeeper or looking into becoming one, you’ve probably already heard about Colony Collapse Disorder (CCD). When a seemingly thriving hive collapses suddenly, it is said to have suffered from CCD. However, there is no clear cut symptom or disease that can be identified as the culprit of CCD, but there is a very clear front runner. The front runner would be the Varroa Destructor, or Varroa mite. The varroa mite’s natural host has been the Asian honey bee (apis cerana) and it has just recently (circa 1980’s) evolved to parasitize the European honey bee (apis melifera). The European honey bee and beekeepers were completely caught off guard by the varroa mite and it’s the reason why there are so many resources being spent to study the mite and develop methods to control it.

There is tons of information online about the varroa mite, so I won’t explain its biology in great detail. Think of the varroa mite as a bee tick. The varroa mite will enter the hive, latch on bees to suck their blood, and parasitize the brood. After the mite has fed itself and its new babies on the bee brood (in pupa stage), the new mites will emerge with the new (weakened) bee and begin the cycle all over again. Using this reproductive method, the varroa mite can reproduce much faster than the bees, which leads to massive infestations within the colony. But wait that’s not all, the varroa mite is also a vector of bee diseases such as deformed wing virus. Deformed wing virus is easy to spot as the new bees suffering from this have deformed shriveled wings.

apistan
Apistan is a widely used chemical treatment against varroa

So what are the solutions being developed to control the mites? The first and most effective is the chemical approach. There are a few very efficient synthetic miticides that are currently being used worldwide to control the mite. If you’ve read our section on “our philosophy” you know that we are not fans of the chemical approach as the chemicals undoubtedly end up on our honey. So let’s concentrate on the “natural” or biological approaches.

The first natural approach that I’d like to cover is the “natural” or “small” cell approach. The idea behind this approach is that we need to get back to a more natural brood comb cell size (4.6mm – 4.9mm) and away from using “standard” wax foundation that has a cell size of 5.4mm. The idea is that bigger bees take longer to develop and therefore give more time for the varroa mother to lay more eggs. So by cutting down the amount of time that it takes a worker bee to develop also cuts down the amount of viable varroa mites produced in that brood cycle.

Cell size 4.8mm
We measured brood comb from a feral beehive that we captured. On average, the cells were 4.8mm in diameter. We have seen cells as small as 4.5mm.

I know that there are a lot of proponents of the small cell approach and I think that it has some merit. The issue with most beekeepers is that this solution is not very practical, mostly because it requires going “foundationless” which means allowing the bees to make the cells whatever size they want to make them and not using a sheet of wax foundation with predetermined cell sizes (most commonly 5.4mm). Recently, there have been a few manufacturers that started producing “small cell” foundation at 4.9mm, even so, for reasons I will not discuss here, this is still a more cumbersome approach, especially for the novice beekeeper. There is also very little scientific evidence that this approach actually works. We have experimented with small cell and still have hives with small cell foundation but we typically see little difference in survival rate compared to hives on “regular” foundation. To us, this is an indication that genetics is more important that cell size when it comes to controlling varroa infestations. Having said that, we have measured quite a bit of brood comb from feral beehives and can attest to the fact that the “natural” sized cells that they are building is between 4.5mm-5.0mm.

The second natural approach is breeding bees that can cope with high varroa infestation levels (and the diseases they carry) or bees that can limit or interrupt the varroa breeding cycle. So far, much effort has been put into breeding “hygienic” bees that can detect varroa mites in capped brood cells and remove the bee pupa before the varroa mite can reproduce. This seems to be a very promising trait and it is one that feral bees are already using to survive. We have seen varying levels of this hygienic behavior in our own bees. Most hives that have this hygienic behavior seem to control varroa and it doesn’t appear to bother them too much.

cells chewed open
It is not natural for bees to uncap brood once it has been sealed.  However, hygienic bees can detect varroa and uncap and remove the pupa. 90% of the time, if you pull out an uncapped pupa, you will find varroa.

We have also witnessed beehives that survive severe varroa infestations by doing a few interesting things. First, the queen will stop laying eggs. This means that there will be no new brood and if there is no new brood, there is no host for the varroa mite to reproduce. Secondly, the bees will begin to sacrifice the pupa that they determine have been infested by varroa. This is very interesting behavior because the last thing the bees want to do is sacrifice the pupa that they have spent so many resources to rear. Not only do they waste resources, but they also lose their next generation workforce. In a way, the hive enters a controlled “self-destruction” mode where they have to harm themselves in order to harm the varroa mite. Lastly, the beehive will rapidly collapse in population, probably because of the die off old bees that aren’t being replaced by new bees. After a few weeks of this self-destruction mode, the varroa mite is flushed out (mostly) and most beehives seem to bounce back.

IMG_2694
The white/gray flakes on this bottom board are dried up varroa infested pupae that the bees have removed from their cells. This hive suffered a severe varroa infestation, but managed to recover.

This behavior typically happens in the fall when varroa infestations are at their worst. It really helps if there is some forage available for the bees to produce at least one cycle of new brood to enter winter with a fresh batch of young bees. Luckily for us, we do not have harsh winters in California and the bees usually have some forage available even in late fall.

It really seems like hygienic bees have the best shot at beating back the varroa problem. For this reason, many research institutions and breeding programs are focusing on breeding this trait into their bee stocks. Here at Estrada Farms we don’t have the resources to monitor infestation levels in beehives year round or to instrumentally inseminate virgin queens to precisely control genetics (yet). We simply rely on the tried and true principle of survival of the fittest. This approach has been working well for us, to the point that we largely stopped taking calls to collect swarms or remove bee hives for a few years due to not having room for them; however, we recently secured another bee yard and will resume collecting survivor bees. We have seen it time and again that these feral survivor bees have a few tricks up their sleeve to control varroa mites, including being hygienic.

If you are looking into buying a beehive, ask the beekeeper how they control the varroa mite. If the answer is through chemical treatments, I would not buy from them. There are plenty of beekeepers that are now raising hygienic bees (to some extent) and we need to support those that are moving in the right direction. If we do this, the varroa mite and its problems will soon be a thing of the past.

If you have any questions about our bees, feel free to contact us.

Hobbyist Vs Commercial

IMG_3715
Our equipment

Much has been written and even more has been said about beekeeping and beekeeping techniques. It would be a futile attempt to try to cover all of the beekeeping philosophies out there. Here we will cover some differences between commercial beekeepers and hobbyist beekeepers.
In the beekeeping world, there are 2 major distinct groups of beekeepers: Hobbyists and Commercial. Hobbyists far outnumber the Commercial beekeepers; however, the commercial beekeepers usually have more hives than hobbyists by an order of magnitude of one thousand. Due to this fact, the techniques employed by the commercial beekeepers are not necessarily applicable to the hobbyist beekeeper and vice versa; Just like the husbandry techniques of a person who raises 5 chickens in their back yard would differ from a chicken farmer with ten thousand chickens in a thirty acre parcel.
Most hobbyist beekeepers (myself included), started beekeeping because they enjoy honey. But not any old honey will do, it has to be 100% natural and “organic” (organic is a bit of a misnomer and we’ll cover that on a future article). Think of it this way: if we only kept bees because we liked honey, then it would be easier to go down to the local grocery store and buy a jar of honey. However, in the information age that we live in, just about anybody knows that commercially produced honey can be (probably is) “tainted” with pesticides, fungicides, miticides, and whatever else the source hive was treated with. Not to mention that off the shelf honey may or may not even be 100% honey despite the “Pure honey” claims on the label. Also, much of it is pasteurized and stripped of much of the properties that make honey so beneficial to us. Here is where the hobbyists’ entrepreneurial spirit kicks in and we take matters into our own hands. Why buy honey when you can produce it yourself? So you buy a few hives (bees are so interesting that it’s hard to stop at one hive) and once you master the beekeeping “basics”, you can produce enough honey for yourself, your friends, and family.
Commercial beekeepers usually have thousands of hives and are usually migratory. This means that they make most of their money pollinating crops and they move their hives from crop to crop. Their main concern is to have plenty of bees (for effective pollination) and so most of them treat their hives with certain chemicals in order to control pests and disease. It has been proven many times that these chemicals end up in the beeswax and in the honey. To some commercial beekeepers, honey is just a byproduct of pollination and honey quality is of secondary concern. I recall watching a video of a package bee producer who kept referring to honey as yellow “junk”. In other words, he wanted his bees to produce more bees (to sell as packages) and not produce honey. Perhaps, this particular beekeeper didn’t advertise his honey for sale, nor do I think that anyone would buy it after watching that video.
As always when discussing this topic, I like to make it clear that this isn’t a competition between commercial and hobbyist beekeepers to determine who is better. It needs to be understood that we have 2 different roles. The big commercial operations have a crucial role in our society by providing us with crop pollination. They quite literally put food on the table. In order to put fruits and vegetables on your table, they need to be effective pollinators. They cannot effectively pollinate our crops if they don’t keep their bees alive; and keeping their bees alive requires effective pest management techniques. I also know that there are many good and responsible commercial beekeepers that are constantly trying to innovate and come up with methods to reduce their treatments and improve honey bee genetics. So I thank them (and appreciate them) for their services, but I’ll pass on their honey. After all, once honey has been processed, pasteurized, and quite literally “sterilized” so that only sugar and chemical traces remain, then I may as well put high fructose corn syrup on my pancakes.

DSC04470
Beehives making honey in the Tehachapi mountains

Luckily for the people who cannot keep their own bees, there are “mid-size” beekeepers, such as ourselves, that keep enough hives to have plenty of honey to share with others, but can keep the “natural” beekeeping approach. We can provide you with natural local honey, pollen, and yes, even your own beehive should you decide to start beekeeping yourself!

Pollination

This is the excerpt for your very first post.

IMG_3633
Carlos standing in an almond orchard pollinated by Estrada Farms.

At Estrada Farms, our main business is beekeeping. Given the fact that the honey market is flooded with cheap Chinese, Argentinian, and Brazilian honey (to name a few), American beekeepers need to find sources of income other than honey. Fortunately for California beekeepers, we live in the state that produces most of the almonds for the entire world! And yes, almonds are 100% reliant on honeybees for pollination (no bees equals no almonds). At Estrada Farms, we have an exclusive almond pollination contract with one grower who understands our “chemical free” approach. For this reason we have negotiated pollination terms with this grower so that they do not spray any pesticides, miticides, or fungicides while our bees are present. Negotiating these types of terms is currently not the industry norm and it’s the reason why we only have one pollination customer. We hope that the rest of the industry will one day do the same. But for now, we are proud of the fact that we can contribute to our local California agriculture economy while not compromising our value of, “Simply Natural”.

IMG_3360
Thanks to our temperate California weather, we were able to deliver some hives with greater than 20 frames of bees. We averaged 15 frames of bees per hive when the industry standard is 8-10 frames.

Home